 HRSensing Reference
iOS HRSensing SDK Integration Guide
Getting Started
Example Project
For a sample project demonstrating the setup of functional app integration, refer to the Example project.
Installation
Requirements
- A computer running macOS
- The latest stable version of Xcode
- The latest stable version of CocoaPods. You can check your version of CocoaPods with
pod --version. - An iOS project that already uses CocoaPods. If you don’t have a project that uses CocoaPods, you can follow these instructions to create one.
- An iOS project that supports iOS 13 and above.
- Collaborator access to the HealthRhythms pod repositories. Contact HealthRhythms support to authorize your GitHub account to access the HealthRhythms iOS SDK.
- Github authentication via SSH
CocoaPods
- In the terminal, add the HealthRhythms pod repository to your installation:
pod repo add ios-podspecs git@github.com:healthrhythms/ios-podspecs.git
pod repo update
- Open your project’s Podfile and add the HealthRhythms pod specs repository to the top of your Podfile:
source 'git@github.com:healthrhythms/ios-podspecs.git'
source 'https://cdn.cocoapods.org/' # required for downstream dependencies of the HRSensing pods
- Add the HealthRhythms pod declaration to your Podfile:
pod 'HRSensing'
- Add the following post-install script at the bottom of your Podfile to prevent runtime linker dyld errors. This step is required because XCFrameworks and their dependencies need to be built for distribution to support Swift library evolution:
# Dependencies of .xcframeworks must be built with BUILD_LIBRARY_FOR_DISTRIBUTION enabled to prevent runtime dyld linker errors.
post_install do |installer|
  installer.pods_project.targets.each do |target|
    if ['HRSensing', 'HRUtils', 'HRSelfReports', 'HRUI', 'Amplify', 'AmplifyPlugins', 'AWSAPIGateway', 'AWSAuthCore', 'AWSCognitoIdentityProvider', 'AWSCognitoIdentityProviderASF', 'AWSCore', 'AWSMobileClient', 'AWSPluginsCore', 'AWSS3', 'CocoaLumberjack', 'json-enum', 'jsonlogic'].include? target.name
      target.build_configurations.each do |config|
        config.build_settings['BUILD_LIBRARY_FOR_DISTRIBUTION'] = 'YES'
      end
    end
  end
end
In the end, your Podfile should look like this Podfile.
- Run
pod installorpod updateto integrate the pods into your project.
Configure the Project Capabilities
Open your application’s workspace in Xcode: open path/to/YourProject/YourWorkspace.xcworkspace
Background Modes
Ensure the Location Updates and Remote Notifications capabilities are enabled in Signing and Capabilities in your app for Background Modes by selecting your app target in the Xcode project navigator like so:
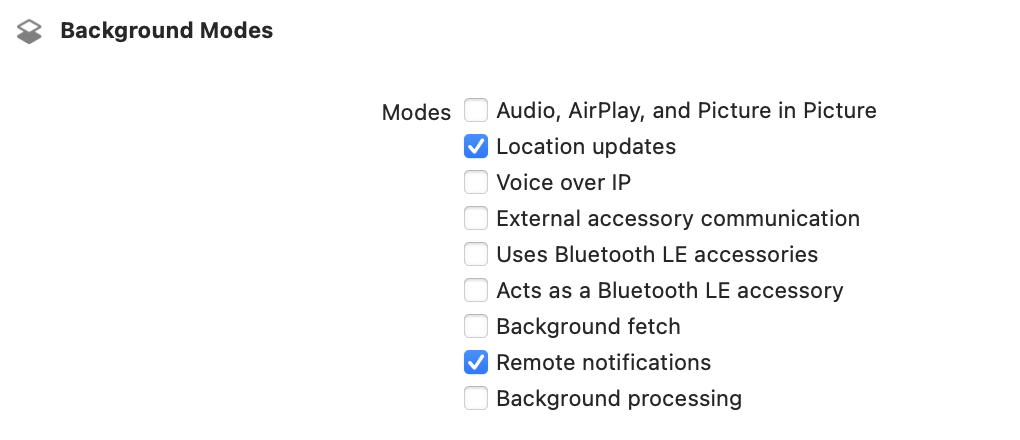
ℹ️ Note: If the Background Modes capability does not exist, it can be added to the project by clicking the ‘+ Capability’ button.
HealthKit
Add the HealthKit capability via the ‘+ Capability’ button. Enable the Background Delivery option like so:
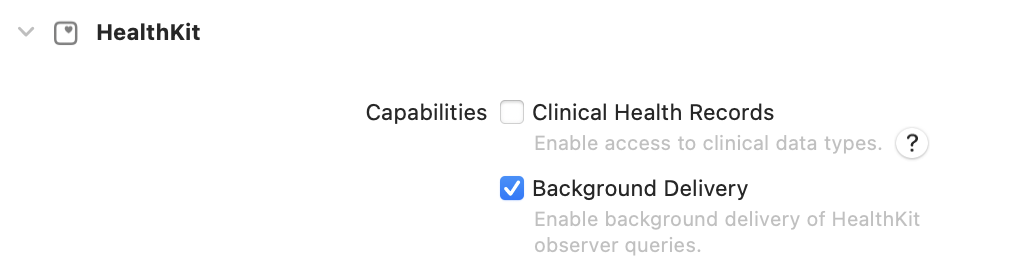
ℹ️ Note: If the HealthKit capability does not exist, it can be added to the project by clicking the ‘+ Capability’ button.
❗Important: This step will require recreation of any provisioning profiles and accept any Xcode prompted Entitlement file updates as necessary.
Permissions
In your Info.plist, ensure that the following keys are set for the applicable permissions for your configuration:
<key>NSHealthShareUsageDescription</key>
<string>HRDemo uses your health data to assess your behavioral metrics.</string>
<key>NSHealthUpdateUsageDescription</key>
<string>HRDemo uses your health data to assess your behavioral metrics.</string>
<key>NSLocationAlwaysAndWhenInUseUsageDescription</key>
<string>HRDemo uses your location to gain insight into your travel patterns which can indicate changes in your mood. This only works if you allow access.</string>
<key>NSLocationAlwaysUsageDescription</key>
<string>HRDemo uses your location to gain insight into your travel patterns which can indicate changes in your mood. This only works if you allow access.</string>
<key>NSLocationWhenInUseUsageDescription</key>
<string>HRDemo uses your location to gain insight into your travel patterns which can indicate changes in your mood. This only works if you allow access.</string>
<key>NSMotionUsageDescription</key>
<string>HRDemo uses your motion data to assess your levels of physical activity.</string>
These can be written to directly if the Info.plist is opened by right clicking -> Open As -> Source Code. Alternatively, if this file is opened as a property list, these options can be added by hovering over a cell and tapping the + icon, using the following keys:
Privacy - Health Share Usage Description
Privacy - Health Update Usage Description
Privacy - Location Always and When In Use Usage Description
Privacy - Location Always Usage Description
Privacy - Location When In Use Usage Description
Privacy - Motion Usage Description
The values for these prompts are what are displayed for the iOS permission requests, and should provide context to your users about why the permissions are being requested.
Configure Sensing in your the Project
💡 Tip: If you’re in a hurry, you can use this AppDelegate.swift file to test the integration in a minimal sample project.
ℹ️ Note: If your project is SwiftUI-based, you’ll need to create an app delegate.
Enable Background Data Uploads (Required)
In your AppDelegate.swift, add the following code for the handleEventsForBackgroundURLSession app delegate method:
import HRSensing

func application(_ application: UIApplication, handleEventsForBackgroundURLSession identifier: String, completionHandler: @escaping () -> Void) {
    Sensing.shared.interceptApplicationBackgroundURLSession(forApplication: application, identifier: identifier, completion: completionHandler)
}
This step enables background uploads of the sensing data to the HealthRhythms Backend. The frequency of uploads can be configured using the backend configuration, and are only initialized when enough data has been collected.
The default frequency of uploads is every hour, and can you configure it for your deployment by contacting HealthRhythms support. Typically, users may see between 5 and 15 uploads per day, depending on activity levels, with typical data usage being under 2MB.
Enable Support for Silent Push Notifications from the HealthRhythms Backend (Recommended)
In your AppDelegate.swift add the following code for the didRegisterForRemoteNotificationsWithDeviceToken app delegate method:
import HRSensing

func application(_ application: UIApplication, didRegisterForRemoteNotificationsWithDeviceToken deviceToken: Data) {
    #if DEBUG
    Sensing.shared.setAPNSToken(deviceToken: deviceToken, environment: .development)
    #else
    Sensing.shared.setAPNSToken(deviceToken: deviceToken, environment: .production)
    #endif
}
Passing in the appropriate APNS environment for your application. This value will default to production if not set.
In the didReceiveRemoteNotification app delegate method:
import HRSensing

func application(_ application: UIApplication, didReceiveRemoteNotification userInfo: [AnyHashable : Any], fetchCompletionHandler completionHandler: @escaping (UIBackgroundFetchResult) -> Void) {
    Sensing.shared.handleBackendNotificationTrigger(userInfo: userInfo, completion: completionHandler)
}
This step allows the HealthRhythms SDK to receive diagnostic messages from the HealthRhythms Backend, useful in troubleshooting sensing issues for your end users, or the remote-disable functionality. This step also allows the delivery of self reports from the HealthRhythms Backend. For more in-depth information, please refer to our Silent Push Notifications guide.
❗Important: Once you set up notifications in your project, send us your app’s bundle ID and its APNS certificate so we can create your app’s endpoint on our end. This step will allow our backend to communicate with your app via our SDK.
Enable Support for Response to User Interaction with Notifications from the HealthRhythms SDK (Recommended)
ℹ️ Note: This is the recommended way to handle the notification interaction. You can also respond to each case directly within the didReceiveResponse method of your AppDelegate.swift.
In your AppDelegate.swift set the UNUserNotificationCenter delegate:
import HRSensing

// Conform the AppDelegate to the UNUserNotificationCenterDelegate protocol
class AppDelegate:  UIResponder, UIApplicationDelegate, UNUserNotificationCenterDelegate {

    func application(_ application: UIApplication, didFinishLaunchingWithOptions launchOptions: [UIApplication.LaunchOptionsKey: Any]?) -> Bool {

        // Set the `UNUserNotificationCenter` delegate
        UNUserNotificationCenter.current().delegate = self

        // any setup code relevant to your app
    }
In your AppDelegate.swift add the following code for the didReceiveResponse user notification center method:
func userNotificationCenter(_ center: UNUserNotificationCenter, didReceive response: UNNotificationResponse, withCompletionHandler completionHandler: @escaping () -> Void) {
    if let notificationType = response.notification.request.content.userInfo["type"] as? String {
        switch notificationType {
        case "self-report":
            NotificationCenter.default.post(name: .selfReportNotificationClicked, object: nil)
        case "permission":
            NotificationCenter.default.post(name: .permissionNotificationClicked, object: nil)
        default: break
        }
    }
    completionHandler()
}
In your primary view controller add the following code to the init method:
import HRSensing

init() {
    // any initialization code relevant to your app

    NotificationCenter.default.addObserver(self, selector: #selector(permissionNotificationClicked), name: .permissionNotificationClicked, object: nil)
    NotificationCenter.default.addObserver(self, selector: #selector(selfReportNotificationClicked), name: .selfReportNotificationClicked, object: nil)
}
Also add these methods to the view controller:
@objc public func permissionNotificationClicked() {
    // Handle the interaction, e.g. present your sensor permissions screen
}

@objc public func selfReportNotificationClicked() {
    // Handle the interaction, e.g. present your self report screen
}
This step has enabled responding to user interaction with self-report and missing permission notifications sent by the HealthRhythms SDK.
Enable User Notifications to Open the App when it’s Terminated (Recommended)
In your AppDelegate.swift add the following code for the applicationWillTerminate app delegate method:
import HRSensing
import HRUtils
import HRUI

func applicationWillTerminate(_ application: UIApplication) {
    let body = String(format: NSLocalizedString("reopen_prompt", bundle: UI.bundle, comment: ""), Utils.displayName, Utils.displayName)
    Utils.scheduleLocalNotification(body: body, trigger: UNTimeIntervalNotificationTrigger(timeInterval: TimeInterval(1), repeats: false))
}
This step enables your app to post a local notification to prompt your end users to reopen the app to allow the HealthRhythms SDK to continue to work in the background.
Downloading and setting up the Configuration
The HealthRhythms Sensing SDK requires a valid configuration to work, and this needs to occur before attempting to initialize the sensors and commence sensing and requires an internet connection.
Typically, this should occur as the first stage of your onboarding flow. You only need to download the configuration file once. Downloading the configuration file should not be triggered everytime your app launches. You can use the Sensing.hasValidConfiguration variable to check if there’s an existing valid configuration file and whether or not a download is required.
Call Sensing.setupConfiguration(withActivationCode:completion:) passing in your activation code (e.g. ‘hr-test-1’). This is assigned by HealthRhythms. Please contact support if you are unsure what your activation code is.
import HRSensing

// The configuration only needs to be downloaded and setup once
guard !Sensing.shared.hasValidConfiguration else {
    return
}

// Setup the configuration: this will download the configuration file and set it up
Sensing.shared.setupConfiguration(withActivationCode: "hr-test-1") { result in
    switch result {
    case .failure(let error):
        // Handle the error.
    case .success:
        // Add post-activation code relevant to your app, e.g. continue onboarding flow.
    }
}
The code snippet above is responsible for downloading the configuration file from the HealthRhythms Backend. The boolean passed into the completion handler will indicate a successful activation or return a SensingError object if there was a problem during activation, which will provide a description string of the problem. Errors may occur for several reasons, such as:
The incorrect configuration name was entered.
There is no internet connection.
The configuration was downloaded, but failed to parse.
If the configuration file needs to be updated, for example, if a sensor is enabled/disabled on the backend, this can be called to update the configuration. It should be called prior to calling Sensing.initializeSensing(completion:).
Set the Unique User ID
Set a unique User ID which will typically use a defined format (e.g. EM10001, EM1002, EM1003), allowing user identification on the HealthRhythms dashboard.
import HRSensing

if Sensing.shared.userID == nil {
    Sensing.shared.userID = id // where `id` is the assigned user ID string
}
💡 Tip: Including ‘test’ anywhere in the user ID string will cause our backend to mark the user as a test user. Typically, this should also occur as part of your onboarding flow, post-activation.
ℹ️ Note: If your backend is configured for a different authentication method, like Single Sign-On, please refer to our authentication guide here.
Request the Sensor Permissions
Before enabling sensing, sensor permissions must be granted to enable sensing data collection.
Check if any required permissions have not yet been authorized by calling Sensing.unauthorizedPermissions().
Then call request permission for each of the unauthorized permissions in turn, by calling Sensing.requestPermission(forType:completion:). Typically, this should also occur as part of your onboarding flow, post-activation.
import HRSensing

Sensing.shared.requestPermission(forType: permission) { success in
    // any post permission request code relevant to your app
}
❗Important: If there is data missing for a user for a particular data stream, incorrect or denied permissions are often the culprit. The user must manually enable incorrect settings or user-denied permissions in the iOS Settings Privacy settings page for your app.
The required permissions will vary depending on the configuration. Typically, there will be permissions for:
Location, which allows location sensing. N.B. on iOS 13 during the initial request, “While Using” should be selected, and “Allows Allow” on earlier releases. On iOS 13 and above, this prompt will appear a second time during normal usage, where the user should select “Always Allow”.
Motion & Fitness, which enables pedometer and activity data sensing.
HealthKit access, which allows the retrieval of additional HealthKit data.
Notifications, for enabling suggestions from the HealthRhythms backend as well as self-report and missing permission reminders.
Initialize the Sensing SDK
Once there are no pending unauthorized permissions, and a User ID has been assigned (or if your configuration supports SSO, that a user is signed in), call Sensing.initializeSensing(completion:) to initialize sensing, which commences sensor data collection and uploads to the HealthRhythms Backend. The Sensing.canBeInitialized(completion:) computed property returns a bool indicating if Sensing can be initialized or not.
import HRSensing


// Check if the SDK can be initialized.
Sensing.shared.canBeInitialized(completion: { result in
    switch result {
    case .failure(let error):
        // Handle the error.
    case .success:
        // Initilize the SDK.
        Sensing.shared.initializeSensing { result in
            switch result {
            case .failure(let error):
                // Handle the error.
            case .success:
                // Add post-initialization code relevant to your app.
            }
        }
    }
})
We recommend you initialize the sensing in two places:
- As part of your onboarding flow, after permission authorization and user signin.
- During your regular app initialization, to ensure that background sensing can occur as soon as the app is initialized. This method only needs to be called once during the app lifecycle.
Present the Next Self Report User Interface (Recommended)
Call Sensing.presentNextSelfReport(_:completion:), to display the upcoming scheduled Self Report to the user.
Optionally, before presenting the next Self Report, you can call Sensing.updateSelfReports(completion:) to update and retrieve any due Self Reports from the HealthRhythms Backend. If the silent push notifications are set up correctly on your backend, then this isn’t necessary but is still safe to call. The Swift implementation should look like this:
import HRSensing

// Optional
Sensing.shared.updateSelfReports { success in
    if !success {
        print("failed to update self reports")
    }

    Sensing.shared.presentNextSelfReport(presenterViewController) { didFinish in
        // UI update logic here.
    }
}
💡 Tip: We recommend you present the next Self Report in a button action handler, table view cell selection delegate, or similar.
Validation
Follow the steps below to verify the data is being collected and uploaded successfully:
- Build and run your app in Xcode
- Enable the Location, Notifications, Motion & Fitness Activity, and HealthKit permissions
- Log in to your HealthRhythms dashboard, and you should see the sensing data uploaded after a few moments.
